Filing literally shapes the outcome of the manicure. It’s normal to want to blow past this step and get to painting as soon as possible. But strong filing technique supports nail health and a flawless finish. A smooth edge prevents snags and breaks. Buffing creates a clean surface for the polish so that enhancements last longer. Precision, pressure, and direction all matter. Let’s talk about how to file nails safely for beautiful results.

Professional Filing Technique
If you prefer the TLDR; there’s a tutorial on Instagram.
For a step-by-step review of professional filing technique, keep reading.
Nail Shape
Obviously, unless you want an oddly shaped set, you need a goal. Select a nail shape to achieve. You might have a personal preference, or you can follow the natural shape of your nail bed. Look at where the bed ends and the free edge begins. If it goes straight across, a square or squoval shape will be flattering. Otherwise, if it curves into the sidewalls, a more rounded shape will look nice.
When to File Nails
It’s not about the time of day or whether or not the moon is full. The best time to file nails is when they are dry. Disregard tips that say to file nails after your shower. When your skin is damp, it’s a great time to push back the cuticles. But if you file nails after they have absorbed water, you run the risk of splitting the keratin.
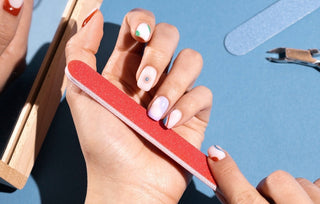
The Best Tools for Filing Nails Safely
You’ll need a file and buffer. The grit depends on nail type. For natural nails, use softer 180 or 240-grit files. For acrylic nails, you can begin with a lower grit or rougher texture, like 80 or 110.
The buffer block should have a fine texture as it’s for polishing.
If you’re using a nail drill or E-file, there are certain bits suited to shaping and polishing natural nails or extensions. If you don’t know what these are, don’t worry about them for now. Instead, perfect your manual filing game.
Which Direction to File?
Please never saw back and forth. Always work in one direction.
Reduce the length by moving the file across the free edge in one direction.
To shape the nail, work from each edge toward the middle.
How to Hold the File?
When working on your own fingertips, hold the file as if someone else was shaping your nails. Bend your fingers so that the tips face inward and are easy to access.
File Natural Nails in This Order
Let’s break it down into even more detail:
- Hold the file upright, not at an angle, and move it across the free edge to reduce the length
- Choose a side and file the side wall from the edge to the middle
- Move to the other side and repeat
- Lightly buff the surface and the edges without thinning the nail
Once the nails are shaped to your liking, remove debris with a lint-free wipe. If it snags somewhere, buff that spot. Then continue with product application. Otherwise, apply cuticle oil and enjoy how nice the nails look and feel!
Cuticle Oil & Massage Oil

Stay Consistent
It’s essential to take your time and pay attention to:
- How you hold the file, whether it’s upright or angled
- How much pressure you’re applying
- How this nail compares to the other nails you’ve just shaped
Try to relax your shoulders and pretend you’re a robot. Keep the same motion and pressure for consistent results. Take it slow because you can’t put the nail back once it’s filed off. Pause every so often to look at the nail from all angles.
How to Overcome Problems When Filing Nails
We all make mistakes, but there’s usually a way to recover from them. Let’s review the most common problems that happen when filing nails.
1. Oops, somehow there’s a nail that’s the wrong shape or length and now it’s too small. What should you do?
You could adjust the others to match, or you could build out the nail with product. There’s also the possibility of switching to a softer shape, something more rounded, to disguise differences in length.
2. Even after buffing, the nail surface is ridged.
This is an easy fix with ridge filler or rubber base gel. Instead of weakening your nails with too much buffing, use a base coat that levels out the surface.
For example, LDS Rubber Base Gel comes in thirty shades to flatter every skin tone. It’s so pretty that pros often choose to simply add a top coat to finish the look.
Rubber base gel is easy to apply because it doesn’t require any special brushes or tools other than a nail lamp to cure. It fills in texture, improves polish adhesion, fortifies brittle nails, and provides more than three weeks of wear time.
LDS Rubber Base Gel - RB-16 - GEL POLISH 0.5 OZ - Bouncy Blush Collection

3. The nails are too fragile to file sufficiently, or one has broken, so now what?
When nails are too thin or brittle to handle shaping, it's time to reinforce instead of reduce. One of the best ways to do this is with a structured manicure using builder gel.
Builder Gel

Structured manicures also fill in imperfections and allow for shaping without stress or breakage. They’re ideal for anyone with peeling, damaged, or weak nails. Bonus: the added strength helps the nails grow out naturally while staying protected underneath.
Another option is using silk wraps to reinforce nails during filing without risking breakage. The goal is to protect the natural nails first then perfect them.
So, don’t panic if nail filing isn’t going as you planned. You have options to help turn things around.

Conclusion
There’s a good reason why celebrity nail artists like Tom Bachik always mention nail prep. It isn’t just to promote products. It’s also because meticulous nail preparation is the foundation of a beautiful manicure. Moreover, filing safely is crucial for healthy nails and will pay off in how easy it is to maintain the look.
Shop our store for essential nail care supplies plus the trendiest colors at amazing discounts. See how to qualify for free shipping, too!