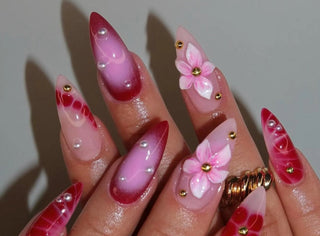
3D nail art flowers look complicated, but once you see how they’re made, it just clicks. You only need a few tools, the right products, and the will to try. Moreover, you have lots of options for today’s textured nail designs because acrylic, poly gel, or hard gel all work beautifully. This tutorial shows what you’ll need for each kind of floral nail design and how to build a simple flower step by step. You’ll also find video links so you can watch the technique in action and follow along. If you’ve been thinking about trying 3D flower nails, this is the place to start.
What Material Is Best for 3d Flower Nails?
What product should you use to sculpt flowers on nails? There are different ways to answer that. You could look at the cost or the level of difficulty. Maybe you want a system that’s easy to integrate with what you already use. So, let’s go over the pros and cons of the three main materials used by nail artists creating 3D flower nail art designs.
Poly Gel
First, there’s poly gel, also known as poly extension gel. It’s a system that includes the best of gel and acrylic worlds and it’s excellent for beginners.
The benefits include:
- Odorless
- Premixed and ready to use
- Compatible with synthetic brushes
- Ideal for sculpting lightweight, durable extensions
- Provides plenty of time to perfect designs
- Compatible with gel polish, chrome powder, and other enhancements
- Meanwhile, the downsides include:
- Only available in a limited range of colors
- Requires a nail lamp to dry
If you’re already set up to do gel manicures, all you need to play with poly gel is a spare brush and slip solution, which is rubbing alcohol.
Let’s take a peek at how to create nail art with poly gel.
3D Poly Gel Flowers on Nails

If you’ve never seen poly gel in action, there’s a brief video that shows how simple it is to build extensions with it. It’s like working with a soft putty and the slip solution keeps it from sticking to the brush.
Unlike acrylic, you don’t have to guess how much to wet the bead. Once you’ve prepped the nails as you would for a gel manicure, including the base coat, scoop up a blob of poly gel and place it where you want the flower. Use a gel sculpting brush dipped in slip solution or a silicone tool or even a cuticle stick to pat the gel into the shape of a petal. Don’t worry if it doesn’t look like you imagined because it’s not going to harden until you set it in the nail lamp. Keep working with it!
Add the next petal and so on and then cure the poly gel in the lamp. Shape the center, cure that, and paint everything with gel polish and a top coat. It’s really that simple.
Lavis Poly Gel

Builder Gel in a Jar
Non-sticky builder gel in a jar is another fun option for creating 3D flower nail art designs. This material is a little less flexible and stiffer than poly gel, but it’s an excellent all around tool.
The benefits include:
- Odorless
- Premixed and ready to use
- No extra liquids needed (no monomer or slip solution)
- Works for nail extensions and textured nail art
- Compatible with synthetic brushes
- Won’t dry until it’s cured in a lamp
- Fully compatible with gel polish, chrome powder, and other enhancements
- However, the downsides are:
- Only available in a limited range of colors
- Needs a nail lamp to cure
- Stiff enough that it needs a firmly bristled brush or hard tool to sculpt
Hard Gel Flowers on Nails

If you’re curious about how to sculpt hard gel flowers, there’s a little video you should see. The artist uses a pencil-like tool to press the gel into a petal shape. You can tell that it’s not as soft as poly gel, which is like thick toothpaste. If possible, experience both products to see which best suits your style.
Lavis Builder Gel In The Jar Ver 2 Collection

Acrylic
Acrylic is the OG system for 3D floral nail art and extensions. There are hundreds of different acrylic nail powders with various effects like glitter and confetti. There’s a steep learning curve, but if you’re up for a challenge, acrylic is fantastic for creative designs.
The benefits are:
- Well-established nail system with many colors and effects available
- Suitable for nail extensions and detailed nail art
- Air-dries so it doesn’t require a nail lamp to cure
- Can be painted and decorated
But the cons include:
- Strong odor that requires ventilation
- Some people are allergic to the monomers so gloves are a good precaution
- Can be expensive collecting necessary supplies
- Requires a natural hair brush
- Practice needed to perfect wetting the bead and working quickly before the material dries
Acrylic Nail Flowers
Check out this video about creating 3D flowers with acrylic. It shows how to build extensions and decorate them. Although parts of the video are sped up, it’s not wrong to say that you’ll need to work quickly. Wet acrylic dries in a couple of minutes. You can test it by tapping it with the handle of your brush because it will make a hollow knocking sound.

But before you can start shaping petals, you need to learn how to get the right consistency for the material. Dip the brush in monomer, press it against the bottom of the dish to release air bubbles, tap off the excess, and dip it in the powder. Stroke it lightly across the surface so that the bead you pick up is not soaked nor crumbly.
Next, there is a technique for how to pull and press acrylic into shape with the brush. For best results, practice these movements on a piece of wax paper before trying them on nails.
Finally, it’s crucial to keep acrylic brushes clean to avoid cross-contamination and keep the bristles from hardening. The good news is that you only need monomer to do that.
While acrylic requires more effort and investment, it’s been the top nail art tool for decades. Mastering it provides a very marketable skill.
Acrylic Powder

Conclusion
The best time to start doing 3D flower nail art is right now! While you feel the enthusiasm, round up your tools and get started. Shop our store for essential nail art supplies and enjoy deep discounts and free shipping. We want to support you in reaching your nail goals!
Source:
https://www.nailpro.com/technique/article/21221187/tips-and-tricks-for-mastering-the-art-of-acrylics